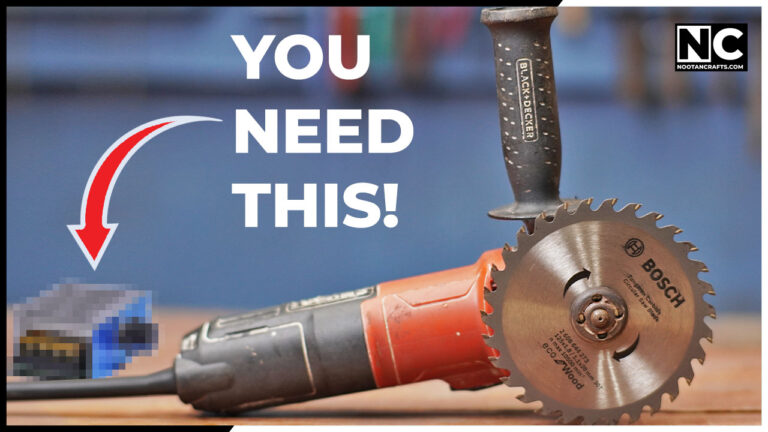
Unplug the grinder first. Then press and hold the spindle lock button on the back of the head, and turn the flange nut counterclockwise. On a grinder that hasn’t been run hard, that nut will often come loose by hand. If it won’t, you need something to grip it with — a pair of long-nose pliers in the two holes, an adjustable plier on the flats, or two bolts and a bar. All three are below.
The reason it’s tight is worth knowing before you start: the disc’s own rotation tightens that nut every time you use the tool. A grinder that has been cutting steel all afternoon has torqued its own nut down far harder than you ever did by hand.
- Long-nose pliers, or
- Adjustable / water-pump pliers, or
- Two bolts thin enough for the nut’s holes, plus a bar
- A short length of pipe or rod for leverage
- Gloves and safety glasses
- A block of scrap wood
Unplugged, not switched off — and the spindle lock is a pin, not a torque tool
Two separate hazards here, and improvised methods make both worse. The first is obvious: a grinder that’s still plugged in can start if the trigger is knocked while your hand is on the disc, and a disc at full speed removes fingers rather than cutting them. Pull the plug or the battery. The second is not obvious at all — the spindle lock is a small steel pin that drops into a slot on the shaft. It is designed to stop the shaft turning while you apply hand pressure with the correct wrench. It is not designed to absorb hammer blows or a meter of leverage, and when it shears you are left with a grinder whose shaft cannot be held at all.
- Unplug it, or take the battery out. Every time, including for a “quick look”.
- Let it cool. A disc that has just been cutting is hot enough to burn through a thin glove, and the nut is tightest while everything is still expanded.
- Never hammer against the spindle lock. Jam the disc against a block of wood to hold the shaft instead — the wood takes the shock, the pin doesn’t.
- Check the disc’s rpm stamp against the grinder’s plate when you fit the new one. A disc rated below the tool’s no-load speed can burst, and the fragments leave at the rim speed of the disc.
- Bin any disc that has been dropped or has a visible crack or chip. A hairline crack is invisible until it opens at 11,000 rpm.
- Guard back on before the plug goes back in. Positioned between the disc and you.
What’s Inside!
- 1 – The Method That Works Without Any Tool at All
- 2 – 1. Long-Nose Pliers in the Nut Holes
- 3 – 2. Adjustable Pliers on the Nut Body
- 4 – 3. Two Bolts and a Bar
- 5 – 4. Punch and Hammer — the Last Resort, Done Properly
- 6 – Thread, Disc Bore and Speed by Grinder Size
- 7 – Fitting the New Disc
- 8 – Where This Goes Wrong
- 9 – Why Grinders Have a Spindle Lock at All
- 10 – Angle Grinder Blade Questions People Actually Ask
- 11 – The One Thing Not to Get Wrong
The Method That Works Without Any Tool at All
Try this before reaching for anything, because on a lightly used grinder it works about half the time.
- Unplug the toolOr remove the battery. Not the switch — the plug.
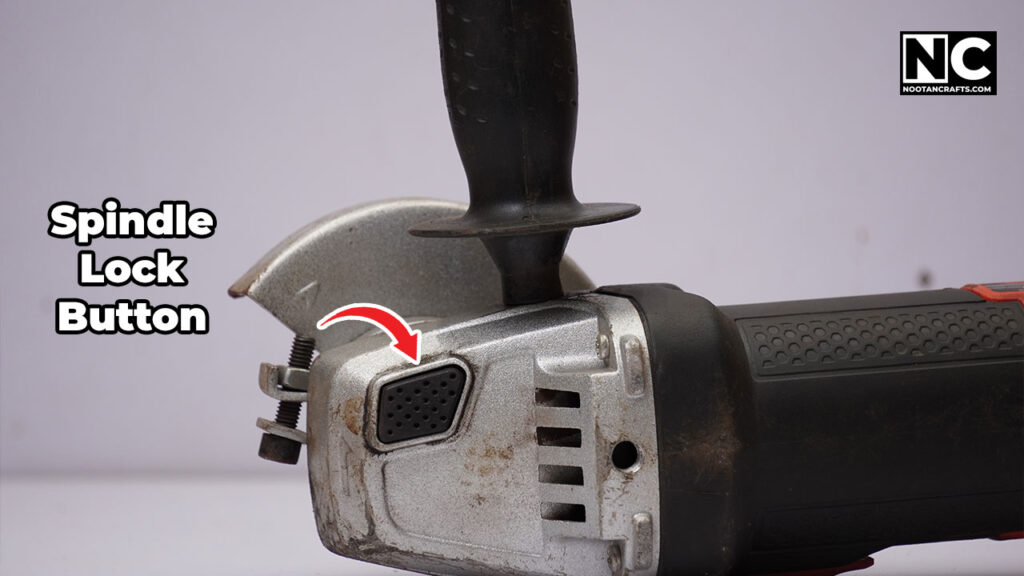
- Press and hold the spindle lockIt’s the button on the back of the gear head. Turn the disc slowly by hand while pressing; the button drops in when the slot lines up, and the shaft stops dead.
- Grip the disc itself and turn counterclockwiseThrough a folded rag or a leather glove, with the outer flange nut facing you. The disc gives you a much bigger lever arm than the nut does. Counterclockwise loosens on a standard right-hand thread.
- If it moves, keep going by handOnce the nut breaks free the rest is finger-tight work.
- If it doesn’t move after two firm attempts, stopDon’t keep straining against the lock pin. Move to one of the methods below, which put the force on the nut instead of the shaft.
Don’t grip a cutting disc to do this. Thin cut-off discs are brittle and will snap in your hand. This works on a grinding disc, a flap disc or a wire cup. On a thin cut-off disc, grip the flange nut instead, or take the disc off the equation entirely by using one of the plier methods.
1. Long-Nose Pliers in the Nut Holes
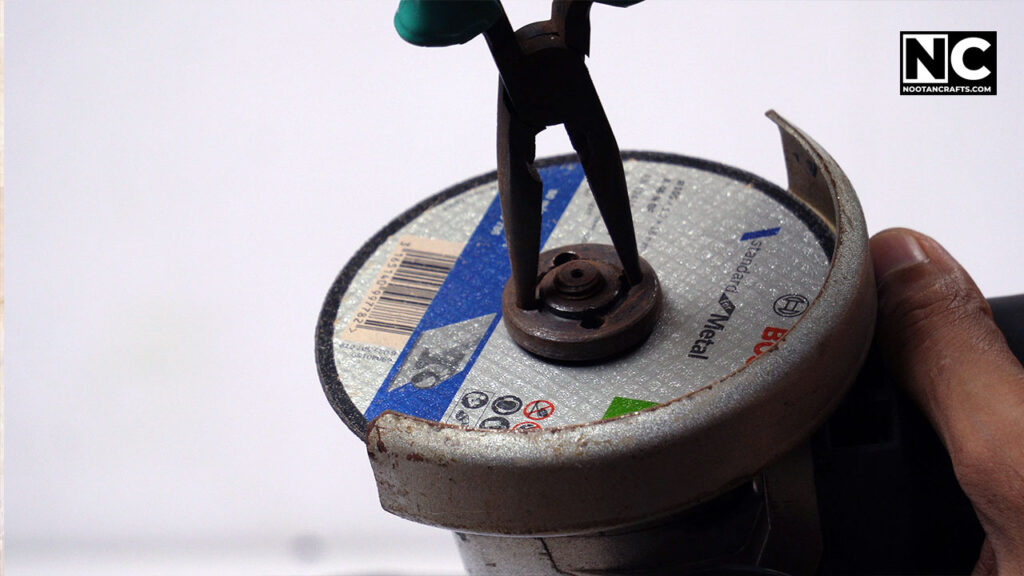
This is the closest substitute for the proper pin wrench, because it does exactly what the wrench does: it puts the load into the two holes the nut was designed to be turned by.
- Open the pliers so the tips sit in both holesBoth, not one. A single tip in one hole will slip out and round the hole off.
- Hold the spindle lock and turn counterclockwiseKeep the pliers square to the nut face so the tips stay seated.
- Add leverage with a bar through the handlesSlide a rod or screwdriver shaft between the plier arms and turn that. It multiplies your grip without you having to squeeze harder.
2. Adjustable Pliers on the Nut Body
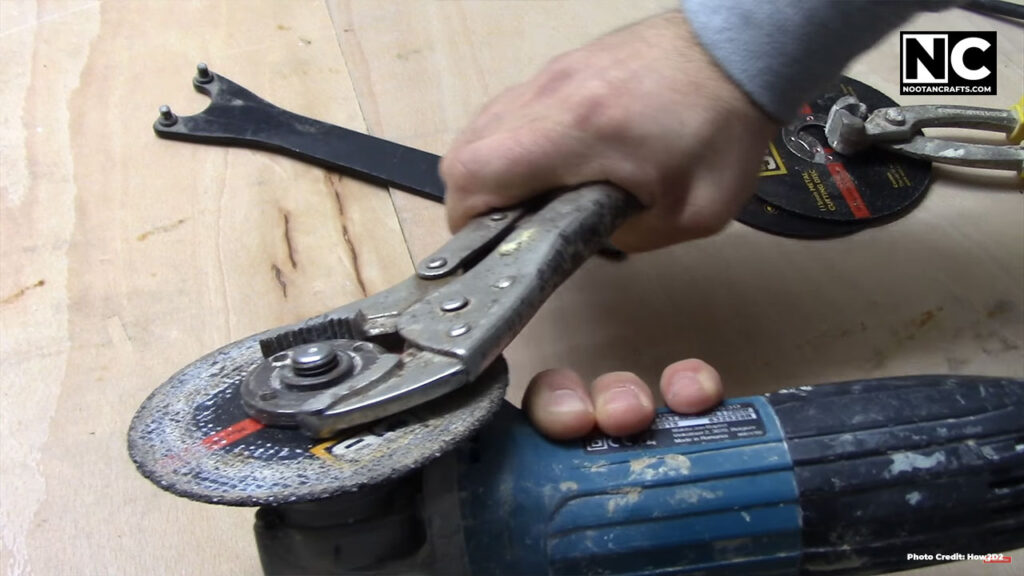
A monkey grip or water-pump plier clamped across the outer flange nut gives you far more turning force than fingers do. Set the jaws so they close on the nut’s outer edge rather than skating across the face, hold the spindle lock, and turn counterclockwise.
The trade-off is that serrated jaws chew up the nut’s edge. That’s cosmetic on a nut you’re going to keep turning with pliers, but it does make the proper wrench fit worse later. If you own the correct wrench and have only mislaid it, this is the method to use least.
3. Two Bolts and a Bar
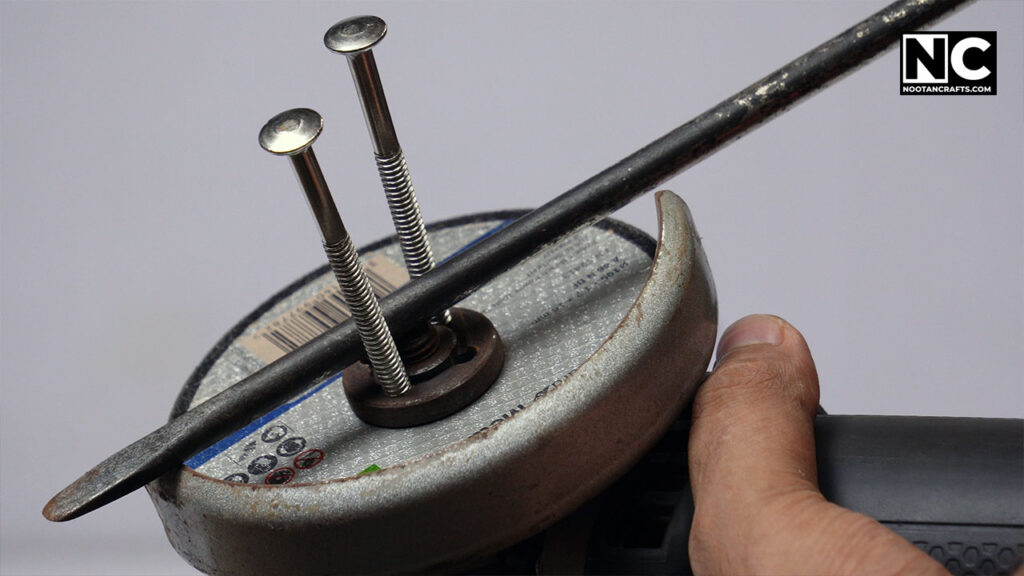
The improvised pin wrench, and the one worth knowing if you have nothing else. You need two bolts whose shanks drop into the nut’s holes — a snug fit, not a loose one.
- Drop a bolt into each holeHeads up, so they stand proud of the nut face.
- Bridge a bar across both bolt headsA screwdriver shaft, a length of rod, a wrench — anything stiff that sits against both.
- Hold the spindle lock and lever the bar counterclockwiseThe two bolts share the load, which is why this works where a single screwdriver tip in one hole just slips.
4. Punch and Hammer — the Last Resort, Done Properly
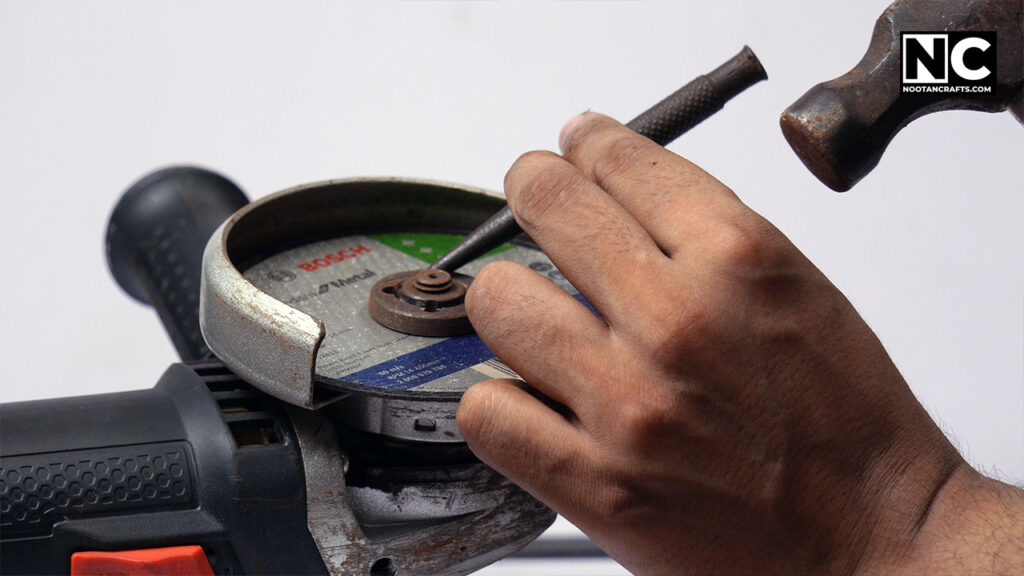
For a nut that has seized — usually rust, or a disc that bound up and torqued the nut down under load. A sharp tap breaks the friction where steady pressure won’t. It is also the method most likely to damage the tool, so it goes last.
- Rest the grinder on a solid surface, head supportedNot held in mid-air. The bench takes the blow, not your wrist.
- Jam the disc against a block of scrap woodThis is the part the original version of this article got wrong, and it matters. Wedge the wood against the disc so the shaft can’t rotate, and let that hold it — not the spindle lock pin. The pin is not made to take impact.
- Set a punch or drift into one of the nut’s holesAngled so the blow drives the nut counterclockwise. A parallel pin punch is ideal; a stout screwdriver will do at a pinch.
- Short, sharp taps — not swingsYou’re using shock, not force. Several light taps free a seized nut better than one heavy blow, and they won’t crack the gear housing.
- Once it moves, switch to a plier methodFinish it by hand. There’s no reason to keep hammering a nut that’s already broken free.
If it still won’t move: a little penetrating oil on the thread, left twenty minutes, resolves most seized nuts. Heat is the other option, but not on a grinder — the bearings and the armature sit directly behind that flange and neither likes a torch.
Thread, Disc Bore and Speed by Grinder Size
Two numbers decide whether the replacement disc will even fit: the spindle thread the flange nut runs on, and the bore through the middle of the disc. The third number — maximum speed — decides whether it’s safe once it does.
| Grinder size | Spindle thread | Disc bore | Typical no-load speed |
|---|---|---|---|
| 100 mm (4 in) | M10, right-hand | 16 mm | Around 11,000-12,000 rpm |
| 115 mm (4.5 in) | M14, right-hand | 22.23 mm (7/8 in) | Around 11,000-12,000 rpm |
| 125 mm (5 in) | M14, right-hand | 22.23 mm (7/8 in) | Around 11,000-12,000 rpm |
| 180 mm (7 in) | M14, right-hand | 22.23 mm (7/8 in) | Around 8,000-8,500 rpm |
| 230 mm (9 in) | M14, right-hand | 22.23 mm (7/8 in) | Around 6,000-6,600 rpm |
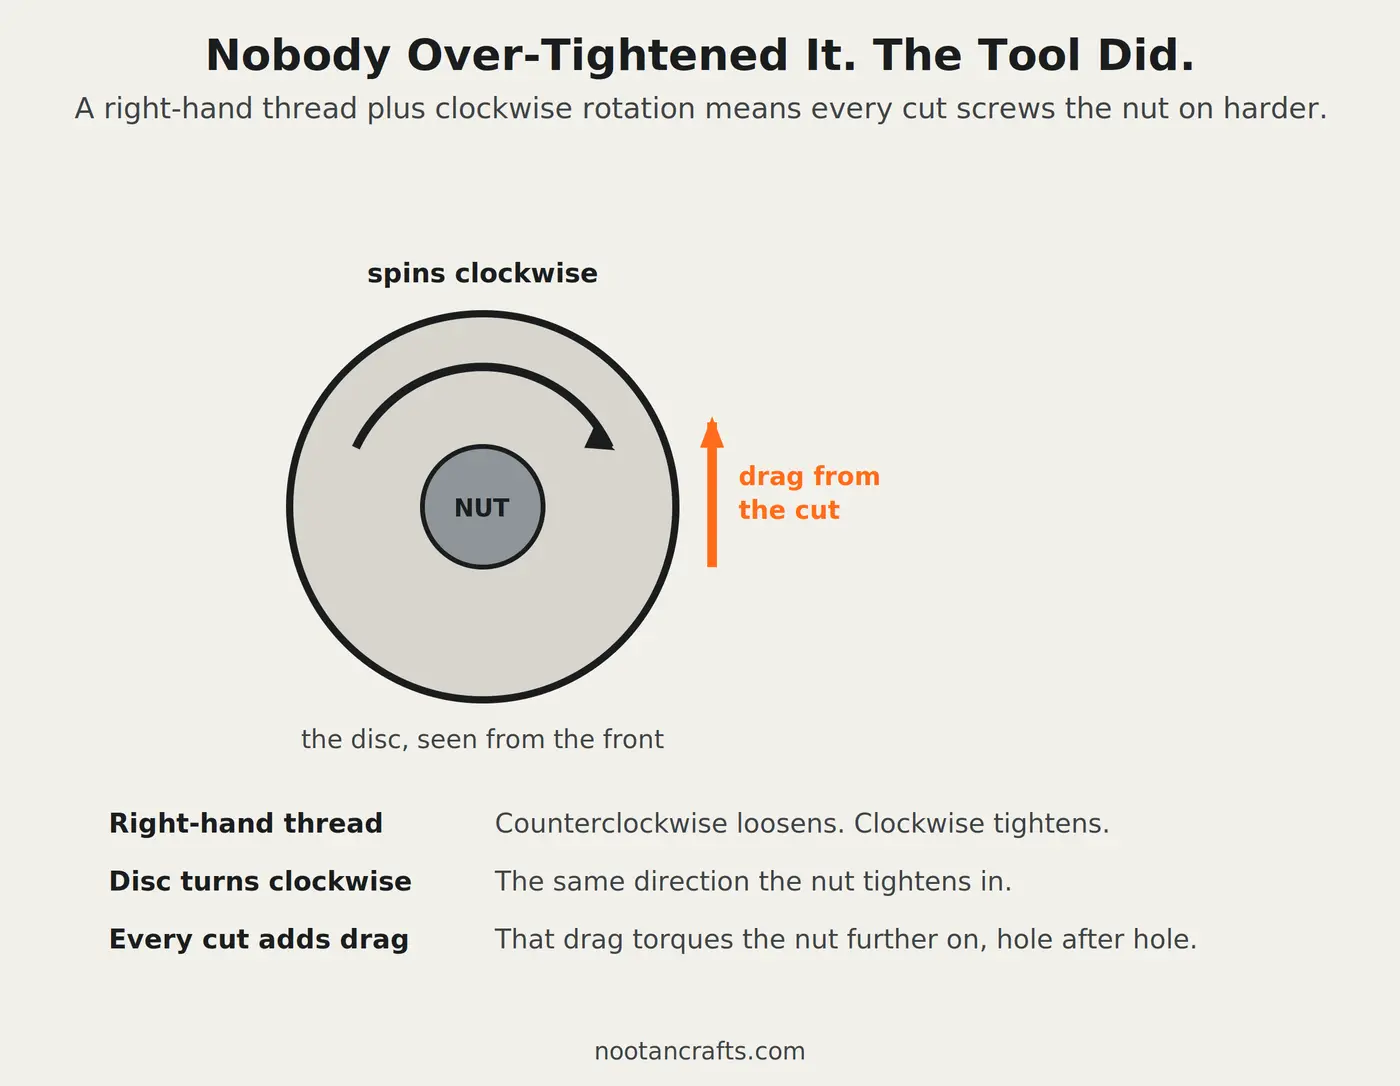
Right-hand thread is why counterclockwise loosens. It also explains the tightness: the disc spins clockwise as seen from the front, and every time the disc meets resistance in the cut, that drag torques the nut further on. Nobody over-tightened it. The tool did.
The speed column is the one to check, not assume. Read the rpm printed on the new disc and the plate on the grinder—if the disc’s number is lower than the tool’s, don’t fit it. Bigger discs are rated slower because rim speed rises with diameter, which is also why a 230 mm grinder is a different class of tool to handle. Controlling that speed is its own subject, covered in how to control an angle grinder’s speed.
Worth knowing before you buy another disc: tool-free flange nuts exist and cost very little. They replace the standard nut and undo by hand with a flip-up lever, on the same M14 thread. If you change discs often — and anyone switching between cutting and grinding does — that one part removes this entire problem permanently.
Fitting the New Disc
- Check the inner flange is seatedIt’s easy to knock the inner flange off with the old disc and not notice. Without it the disc clamps against the shaft shoulder and runs out of true.
- Read the new disc’s rpm rating and its intended materialA cutting disc is not a grinding disc. Using a thin cut-off disc for side grinding is the classic way to shatter one.
- Seat the disc, then fit the flange nut the right way roundOn a thin cutting disc the raised boss of the nut usually faces outward; on a thick grinding disc it faces inward, into the disc’s center. Get this wrong and the nut clamps on the wrong surface.
- Hand-tight, plus a nudgeFirm hand pressure with the spindle lock held is enough. The tool will finish tightening it for you within seconds of running.
- Guard on, plug in, run it free for a few secondsAway from your body, with nothing in front of the disc. A disc with a flaw usually fails in the first seconds at speed, which is exactly why you let it spin up before it touches work.
Where This Goes Wrong
- Hammering while the spindle lock takes the load. The pin shears or the slot deforms, and then nothing holds the shaft. This is a repair, not an inconvenience.
- Turning the wrong way. Standard grinders are right-hand thread — counterclockwise off. Forcing clockwise just tightens a nut that was already tight.
- Rounding out the nut’s holes. One screwdriver tip in one hole concentrates all the force on a thin wall of metal. Use both holes, always.
- Losing the inner flange. It comes away stuck to the old disc and gets thrown out with it. Check for it before fitting the new one.
- Over-tightening the new disc. People compensate for a nut that was hard to remove by cranking the new one down. That guarantees the next change is worse, and it stresses a brittle disc against the flange.
- Refitting a disc that was dropped. Bonded abrasive discs crack internally. There is no way to inspect for it and no second chance if you get it wrong.
Why Grinders Have a Spindle Lock at All
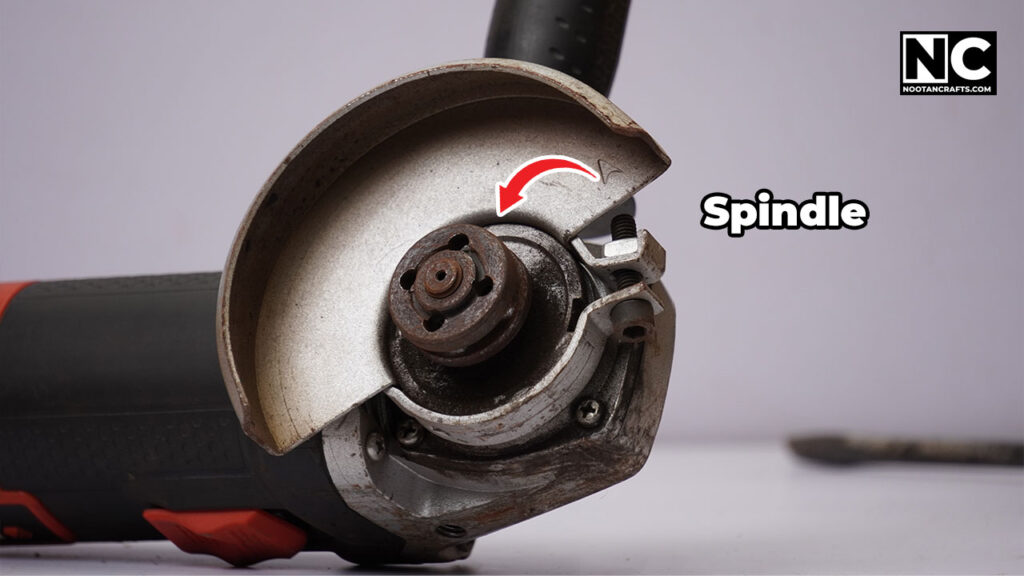
The spindle is the driven shaft the disc mounts on. Turning the nut also turns the shaft, so without something holding it you’re just spinning the whole assembly. The lock is a spring-loaded pin that drops into a slot machined in the shaft and stops it — enough to resist hand pressure on a wrench, and nothing more than that.
Designs vary. Most grinders put the button on top of the gear head; a few use a sliding catch, and some cordless models interlock the lock with the trigger so the tool can’t start while it’s engaged. If the button won’t drop in, turn the disc slowly by hand while pressing — you’re waiting for the slot to come round.
If you’re newer to the tool, the disc-changing routine is only worth having once the rest of the handling is right — start with how to use an angle grinder safely, and if you’re still choosing one, corded versus cordless changes how often you’ll be doing this at all.
What I’d buy for this job


Last update on 2026-10-13 / Affiliate links / Images from Amazon Product Advertising API
Angle Grinder Blade Questions People Actually Ask
Which way does an angle grinder nut undo?
Counterclockwise, on the standard right-hand thread used by essentially every mainstream grinder. Left-hand-threaded spindles are rare and are marked as such. Hold the spindle lock and turn the nut counterclockwise as you face it.
Does this work on every angle grinder?
On any grinder with a conventional two-hole flange nut, yes. It does not apply to tool-free quick-release nuts, which undo by hand with a lever and need no tool in the first place, and grinders with an unusual nut shape may need the manual checked.
The spindle lock button is stuck. What now?
Usually grinding dust packed around the button. Blow it out with compressed air and work the button a few times with the tool unplugged. If it still won’t engage, don’t improvise around it by hammering — hold the shaft by jamming the disc against wood instead, and get the lock cleaned or replaced.
Is it risky to change the blade without the proper wrench?
The removal isn’t the risk. The refit is. An improvised method makes it easy to under-tighten, leave the inner flange out, or fit the nut the wrong way round — and any of those lets the disc move at speed. Check the flange, check the nut orientation, and spin it free for a few seconds before it touches work.
How tight should the nut be?
Firm hand pressure with the spindle lock held, and no more. The disc’s own rotation tightens it in use, which is why over-tightening now only makes the next change harder.
When should a disc be replaced?
When a cutting disc has worn down enough that it no longer clears the material, when a grinding disc has lost its cutting action and starts to glaze and burnish rather than cut, or immediately if there’s any chip, crack, or a wobble you can feel through the handle. Bonded discs also have an expiry date printed on the label; past it, bin them.
Can I use pliers to tighten it as well as loosen it?
You can, but don’t. Pliers make it easy to apply far more torque than the joint needs, and every extra turn now is torque you’ll be fighting next time. Tighten by hand.
The One Thing Not to Get Wrong
Improvising the removal is fine. Improvising the refit is not. Unplug it, get the nut off however you can, then be exact about what goes back on: inner flange seated, disc rated at or above the grinder’s speed, nut the right way round, hand-tight, guard on. Spin it free for a few seconds before it meets metal — that’s the check that costs nothing and catches the disc that was never going to survive.